


In my previous article, we explored the fascinating realm of the mediator pattern. Examining its potential and adaptability highlighted how it can simplify the way we structure and manage communication between components in our software applications. We also introduced you to the innovative Pipelines library, demonstrating how it can simplify the implementation of the mediator pattern. If you missed the first part, I encourage you to read it HERE.
I mentioned that the mediator pattern works seamlessly with other design patterns. We showcased an example of the CQRS pattern, commonly used in clean architecture. So, what’s next in our exploration? Let’s delve into the Chain of Responsibility pattern.
The importance of chain of responsibility
The Chain of Responsibility is a behavioral design pattern that allows you to pass requests along a chain of handlers. When a request arrives, each handler has the choice to either process the request or pass it to the next handler in the chain.
The theory may seem straightforward, but how can we put it into practice? To illustrate its practical application, we’ve prepared a hands-on example that demonstrates how to use the Chain of Responsibility pattern with the Pipelines library.
So, let’s try to analyze an example of order creation, where there are several challenges:
- verifying a product’s availability
- applying a discount code
- receiving a loyalty discount
- receiving a confirmation email
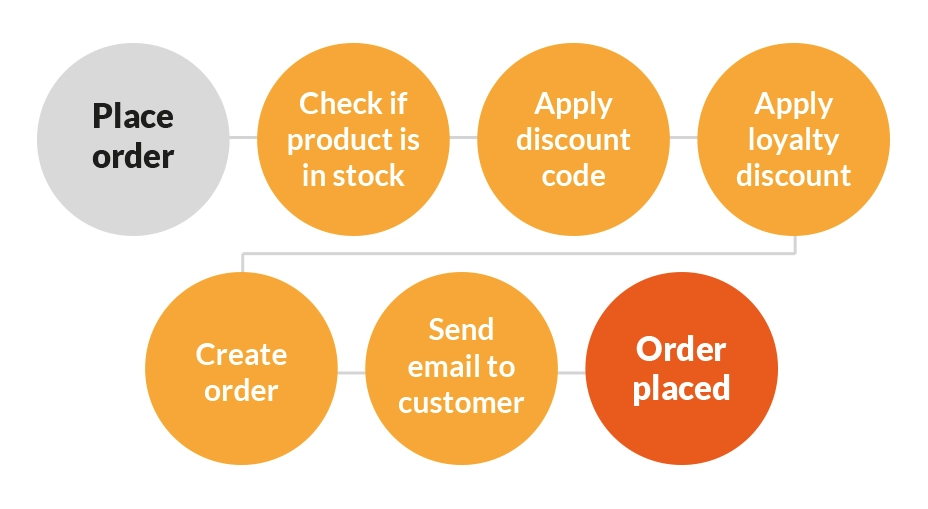
Analyzing this example, we can prepare it in the following way:
- Decorator: Check if the product is in stock
- Decorator: Apply the discount code
- Decorator: Apply the loyalty discount
- Handler: Create the order
- Decorator: Send an email to the custome
If you’d like to analyze this case directly from the code, check it out in this repository. There you’ll find two examples on how to handle this process, one of which will be featured in this article.
So, as in the previous example, we need to start by preparing the interfaces:
public interface IPlaceOrderV2Input

{ }


public interface IPlaceOrderV2Handler<in TInput> where TInput : IPlaceOrderV2Input

{

 public Task<Order> HandleAsync(TInput command, CancellationToken token);

}


public interface IPlaceOrderV2Dispatcher

{

 public Task<Order> SendAsync(IPlaceOrderV2Input command, CancellationToken token);

}
To execute the order process, we’ll need data in the form of a list of products and discount codes:
public record PlaceOrderV2(List Products, string DiscountCode) : IPlaceOrderV2Input;
So, let’s implement our steps in the order process. Here, we’ll use the automatic decorator registration feature. How will it work? Well, to combine decorators into a specific process, we’ll use an attribute called “OrderStepV2”. For your reference, the inclusion of “v2” in the name is associated with the second example available in the repository. Thanks to its “StepNumber” parameter, we can determine the appropriate execution order of decorators.
public class OrderStepV2 : Attribute

{

 public OrderStepV2(int stepNumber)

 {

  StepNumber = stepNumber;

 }

 public int StepNumber { get; }

}
With the interfaces and attributes prepared, we can now register a new pipeline:
services.AddPipeline()

 .AddInput(typeof(IPlaceOrderV2Input))

 .AddHandler(typeof(IPlaceOrderV2Handler<>), processAssembly)

 .AddDispatcher<IPlaceOrderV2Dispatcher>(processAssembly)

 .WithDecorators(x =>

 x.WithAttribute<OrderStepV2>().OrderBy(z => z.StepNumber), processAssembly)

 .Build();


services.AddScoped<DiscountState>();
What’s immediately noticeable is that we have registered decorators using the “WithAttribute” syntax, which allows us to find all decorators marked with the OrderStepV2 attribute and sort them based on the StepNumber parameter of that attribute. This means we do not need to manually add each decorator.
Another noteworthy element is the inclusion of the “DiscountState” object in the registration process. We have several types of discounts that, once accumulated, give the final value applied during order placement. Discounts are calculated by different steps in the decorators and added up. There are two ways to pass the current discount state:
1. You can pass the list of discounts as a method parameter during order placement.
2. You can prepare an object that will be available for a single order, allowing each decorator and handler to access it.
For this example, I‘ve chosen an approach using a shared object named “DiscountState” to store the discount state. Since it is registered as Scoped, it’s only available for a specific order. Therefore, there’s no risk of accidentally using the “DiscountState” while placing another order.
Implementing order process steps
Step One: Check if the product is in stock. We’ll make sure that the products the user wants to purchase are available in the inventory.
[OrderStepV2(1)]

public class CheckIfProductIsInStockV2 : IPlaceOrderV2Handler<PlaceOrderV2>

{

 private readonly IPlaceOrderV2Handler<PlaceOrderV2> _handler;

 private readonly IStockService _stockService;


 public CheckIfProductIsInStockV2(IPlaceOrderV2Handler<PlaceOrderV2> handler, IStockService stockService)

 {

  _handler = handler; _stockService = stockService;

 }

 public async Task<Order> HandleAsync(PlaceOrderV2 command, CancellationToken token)

 {

  foreach (var productDto in command.Products)

  {

   if (!_stockService.CheckIfInStock(productDto.Id, productDto.Quantity))

   {

    throw new Exception($"Product with Id {productDto.Id} is out of stock");

   }

  }


  return await _handler.HandleAsync(command, token);

 }

}
If everything is fine, we proceed to the next step in our process.
Step Two: Apply the discount code. We check the discount code provided by the user. If the code is still available, we then add it to the DiscountState.
[OrderStepV2(2)]

public class ApplyDiscountCodeV2 : IPlaceOrderV2Handler<PlaceOrderV2>

{

 private readonly IPlaceOrderV2Handler<PlaceOrderV2> _handler;

 private readonly IGetCodeDiscount _getCodeDiscount;

 private readonly DiscountState _discountState;


 public ApplyDiscountCodeV2(IPlaceOrderV2Handler<PlaceOrderV2> handler, IGetCodeDiscount getCodeDiscount, DiscountState discountState)

 {

  _handler = handler;

  _getCodeDiscount = getCodeDiscount;

  _discountState = discountState;

 }

 public async Task<Order> HandleAsync(PlaceOrderV2 command, CancellationToken token)

{

 var discount = _getCodeDiscount.GetByCode(command.DiscountCode);

 if (discount != null)

 {

  _discountState.Add(discount);

 }


 return await _handler.HandleAsync(command, token);

 }

}
The DiscountState will be used in the order creation step, but I’ll explain that later.
Step Three: Apply the loyalty discount. Here, we’ll attempt to add another discount, known as the loyalty discount.
[OrderStepV2(3)]

public class ApplyLoyaltyDiscountV2 : IPlaceOrderV2Handler<PlaceOrderV2>

{

 private readonly IPlaceOrderV2Handler<PlaceOrderV2> _handler;

 private readonly IGetLoyaltyDiscount _getLoyaltyDiscount;

 private readonly IUserContext _userContext;

 private readonly DiscountState _discountState;


 public ApplyLoyaltyDiscountV2(IPlaceOrderV2Handler<PlaceOrderV2> handler, IGetLoyaltyDiscount getLoyaltyDiscount, IUserContext userContext, DiscountState discountState)

 {

  _handler = handler; _getLoyaltyDiscount = getLoyaltyDiscount; _userContext = userContext; _discountState = discountState;

 }

 public async Task<Order> HandleAsync(PlaceOrderV2 command, CancellationToken token)

 {

  var discount = _getLoyaltyDiscount.GetByUserId(_userContext.GetUser());

  if (discount != null)

  {

   _discountState.Add(discount);

  }


  return await _handler.HandleAsync(command, token);

 }

}
Step Four: Create the order. We’ve now reached the most crucial step – creating our order:
public class CreateOrderV2 : IPlaceOrderV2Handler<PlaceOrderV2>

{

 private readonly IOrderRepository _orderRepository;

 private readonly IGetProducts _getProducts;

 private readonly DiscountState _discountState;


 public CreateOrderV2(IOrderRepository orderRepository, IGetProducts getProducts, DiscountState discountState)

 {

  _orderRepository = orderRepository;

  _getProducts = getProducts;

  _discountState = discountState;

 }


 public async Task<Order> HandleAsync(PlaceOrderV2 command, CancellationToken token)

 {

  var productsIds = command.Products.Select(x => x.Id).ToList();

  var products = _getProducts.Get(productsIds);


  var order = new Order(products, _discountState.Discounts.ToList());

  await _orderRepository.AddAsync(order, token);


  return order;

 }

}
Since the previous steps have validated all the requirements and calculated all the discounts, the Handler can do its job – preparing the order.
Step Five: Send an email to the customer. This might be confusing for you because OrderStepV2 has a parameter of 4, not 5 – and we started counting from 1. This is because the decorator was executed before order creation, making it step 4 in practice. However, since we want to perform a side effect by sending an email, we first call “_handler.HandleAsync” to get the result, and then proceed with the email delivery.
[OrderStepV2(4)]

public class SendEmailToCustomerV2 : IPlaceOrderV2Handler<PlaceOrderV2>

{

 private readonly IPlaceOrderV2Handler<PlaceOrderV2> _handler;

 private readonly IEmailScheduler _emailScheduler;


 public SendEmailToCustomerV2(IPlaceOrderV2Handler<PlaceOrderV2> handler, IEmailScheduler emailScheduler)

 {

  _handler = handler; _emailScheduler = emailScheduler;

 }


 public async Task<Order> HandleAsync(PlaceOrderV2 command, CancellationToken token)

 {

  var order = await _handler.HandleAsync(command, token); var content = CreateContent(order);


  await _emailScheduler.Schedule(content,token);


  return order;

 }

 private string CreateContent(Order order)

 {

  return "Fake email content based on product list";

 }

}
We’ve reached our goal, and the order has been prepared! Let’s analyze what we have achieved using the Pipelines library and the Chain of Responsibility pattern:
- Separation of Concerns: Utilizing the Chain of Responsibility pattern enables a clear separation of responsibilities and operations performed at various stages of the order placement process.
- Flexibility: Adding and removing decorators can be straightforward, making the solution flexible and adaptable to potential changes in the order placement process.
- Testability: Breaking down the process into smaller steps makes it easier to test each stage independently.
- Extensibility: If there are future requirements regarding the order placement process, you can easily extend the chain without modifying other steps.
An additional advantage of this implementation is that it aligns two SOLID principles:
- Single Responsibility Principle
- Open/Closed Principle
The real-world advantages of Pipelines
Pipelines demonstrate how to seamlessly merge two powerful design patterns, the Mediator and Chain of Responsibility, creating a synergy that enables the development of elegant solutions. This dynamic combination not only resists the challenges of evolving requirements but also sticks to the best programming practices.
As the creators of the Pipelines library, our goal was to contribute to the open-source community by providing a tool for easily implementing use cases like the Chain of Responsibility and Mediator. While the Chain of Responsibility pattern isn’t overly complex, using it can make code a bit complicated. We wanted to avoid that, so our Pipelines library allows for easy and universal utilization of these patterns without unnecessary restrictions. Our aim is to assist developers in embracing these patterns seamlessly, making their code simpler, more efficient, and elegant. To get more insights from our cross-functional team of experts, or to find out how they can drive your software development, fill out the contact form.

About the authorMateusz Wróblewski
Senior Software Engineer
Mateusz has been working as a full-stack developer for 7 years but has been mostly focused on the backend part of programming. He discovered his love for coding during college, and right from the start, he knew that .NET was the technology he wanted to work with. A software architecture enthusiast, Mateusz is a member of Software Mind’s .NET Guild, a community of experts who share experiences, explore new technologies and present insights at industry events and universities. A big fan of Clean Architecture, which he's used in several projects, Mateusz has recently become involved in open-source projects and is currently working on the Pipelines library.